Getting Started - Tools Overview - KEGG - GO - KOG - Track Editor - Browser - BLAST - Protein Page - Annotation Page
Track Editor
The Track Editor allows you to create new models within the "User Models " track of the JGI Browser.
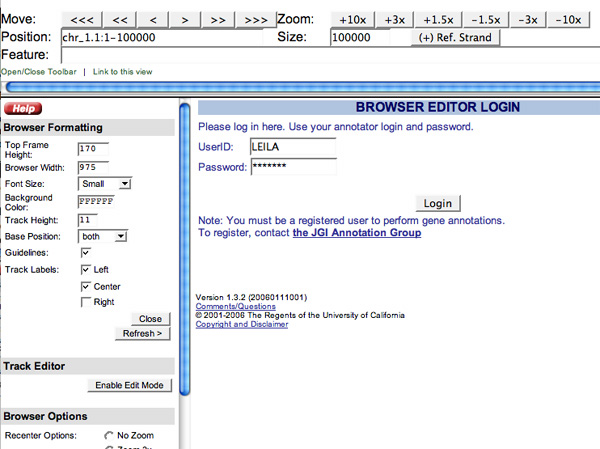
To get started, click the "Open/Close Toolbar " located in the upper left-hand corner of the browser window. Once the Toolbar is open, click the "Enable Edit Mode" button located in the "Track Editor" section . Here you will need to enter your User ID and password (use the same one you created for the annotation tool), and click the "Login" button:
Once you have entered your login information the browser will automatically refresh with the Track Editor features. If the "User Models" track does not appear click on the "Load Default Track Settings" button under the "Track Viewing Options" on the toolbar. This will refresh the track settings in your browser session.
To log out of the Track Editor, click the "Disable Edit Mode " button located in the "Track Editor" section of the Toolbar.
Using the Track Editor Features
You can use the Track Editor feature to:
- Create a new model by copying an existing model
- Edit a new model
- Add existing exons to a new model
- Create an ab initio model
To view the edited or newly created models click the track name "User Models" to expand the track. Models are color-coded on the track to indicate the current status.
Create a New Model by Copying
To create a new model on the "User Models " track by copying an existing model:
- Expand any gene model, EST, or BLASTx track and click on the model you want to copy. A menu opens with the name of the model you selected.
- From the menu click "Copy model to track>" and select "User Models."
- The browser will refresh and the new model will appear in the "User Models" track. The name of the new model, which appears on the left-hand side of the browser, contains the first three letters of your user name followed by the original model, EST or BLASTx alignment name.
Edit a New Model
If you want to edit an existing model that was already released (colored green on the "User Models" track) click "Block User Model" to block community access to this model while you are editing.
To edit a specific exon from a model on the "User Models" track:
- Click on the model you want to edit. A menu opens with the name of the model you selected.
- From the menu click "Zoom browser into>" and select the specific exon you would like to edit. The browser will automatically refresh to display the boundaries of your selected exon.
- Click the exon and select "Exon menu". A drop-down menu and editing boxes will appear as well as vertical lines that position the exon relative to the amino acid sequence below the scaffold. These vertical lines align with the outer edges of the amino acids at each end of the exon. At this point you can: 1) add this exon to another existing model in the "User Models" track, 2) merge the selected exon with upstream or downstream exons which will create one large exon without any intron sequence, 3) delete the exon from the model entirely. To edit the exon, enter new coordinates into the editing boxes, or extend or shrink the exon from either end 1 - 3 nucleotides at a time using the "+" and "-". Click "Save" in each box to save your changes to the exon coordinates.
To return to the drop-down menu for the model itself, without making any edits to the exon, click "Model menu".
To edit the CDS of a model on the "User Models" track:
- Click on the model you want to edit. A menu opens with the name of the model you selected.
- From the menu click "CDS coordinates." A drop-down menu and editing boxes will appear as well as vertical lines that position the exon relative to the amino acid sequence below the scaffold. These vertical lines align with the outer edges of the amino acids at the beginning and end of the CDS. If the CDS boundary is out of the visible area the appropriate menu will not appear.
- To edit the CDS, enter the coordinates into the editing boxes, or extend or shrink the CDS from either end 1 - 3 nucleotides at a time using the "+" and "-". Click "Save" in each box to save your changes to the CDS coordinates.
When you have finished editing a model and are ready to release it to the community, click "Release User Model."
Add an Exon to a New Model
To add an exon from a model to an existing model in the "User Models" track:
- Expand a gene model track and click on the exon you want to copy. A menu opens with the title "Exon:" followed with the name of the model you selected.
- From the menu click "Add exon to model> " and select an existing model.
Create an Ab Initio Model or a New Exon
If there is no model predicted but there is EST data, protein BLASTx hits, or a user generated BLAST/BLAT alignment at the locus of interest, then:
- Expand the EST, BLASTx or User BLAST/BLAT track and click on a specific EST. protein or BLAST/BLAT alignment.
- From the model menu select "Copy model to track" and choose "User model" track.
- Follow the directions under "Edit Model on the User Track.
If there is no model predicted and there are no EST or protein alignments at the locus of interest first determine whether the "User Models" track contains any models. If there are models present:
- Click on any model in the "User Models" track and select "Create new model".
- A new window will appear asking for a "Model name" and the strand on which you would like to create your model. Enter this information and select "save". The browser will refresh and an empty track will appear. On the left-hand side of the empty track a label will appear containing the first three letters of your user name followed by the name of your new model.
- At this point you can build the new model exon by exon. To create the first exon of your new model click on the empty track and select "Create new exon". A new window will appear asking for an "Exon start" and an "Exon end" . In this window you must enter the genomic start and stop coordinates for your new exon. Click "save". The browser will refresh and your new exon will appear in the "User Models" track.
- To create a multi-exon new model click on the exon you just created and as in step 3 enter the genomic start and stop coordinates in the new window for the next exon. These two new exons will automatically merge to create a multi-exon gene model.
- When you are finished creating new exons, click on the new model and select "Release User Model". Protein analysis is automatically run on released, user created models and a protein page will be generated. Once the analysis is complete---which can take from 5 minutes to an hour--you can start annotating your new model.
If there are no models present in the User model track:
- Condense the User Models track.
- Click on the empty space below the User Models label on the browser. Select "Create new model".
- A new window will appear asking for a "Model name" and the strand on which you would like to create your model. Enter this information and select "save". The browser will refresh. Click on the "User Models" label to expand the track or on the "+" at the far left side of the track. An empty track will appear. On the left-hand side of the empty track a label will appear containing the first three letters of your user name followed by the name of your new model.
- At this point you can build the new model exon by exon. To create the first exon of your new model click on the empty track and select "Create new exon". A new window will appear asking for an "Exon start" and an "Exon end". In this window you must enter the genomic start and stop coordinates for your new exon. Click "save". The browser will refresh and your new exon will appear in the "User Models" track.
- To create a multi-exon new model click on the exon you just created and as in step 3 enter the genomic start and stop coordinates in the new window for the next exon. These two new exons will automatically merge to create a multi-exon gene model.
- When you are finished creating new exons click on the new model and select "Release User Model". Protein analysis is automatically run on released, user created models and a protein page will be generated. Once the analysis is complete---which can take from 5 minutes to an hour--you can start annotating your new model.
Releasing and Blocking Models
- Once you have finished editing a model, click on the model and select "Release User Model." The model color will change from red to green, indicating that it is now available to edit by all users.
The release method also runs several genome model integrity tests:
- Check if CDS length is divided by 3
- If transcript start <= CDS Start
- If transcript end >= CDS end
- If CDS start or end is in model intronic space.
If there are no errors you can proceed with the release.
The model color will change from red to green indicating that it is now available to be edited by all users. Released models then become publicly visible.
- Blocking a user model ensures that only one person can edit a model at a time. To use this feature while editing an existing model on the User Track, click on the model and select "Block User Model". The model color will change from green to red, indicating that it is now blocked from editing by all users.
Explanation of Model Coloring
Green:
- The model is currently released. Automated protein analysis is performed on these models. You can access this analysis on the model's protein web page.
Blue:
- The model was just copied and has not been edited. The model is currently blocked and can be modified only by the user who copied it to the User Models track.
Red:
- The model has been edited by the user and has not been released. The model is currently blocked and can be modified only by the user who copied it to the User Models track.